Doing It Right Keeps a Steel Building Watertight
We discussed the importance of using a metal building system with premium quality fasteners. How those screws are installed is equally important to the durability and waterproofing of a steel building. Learn how to install steel siding with our guide.
 The Proper Gear for Handling Steel Panels Safely
Preventing accidents is job one at a metal building job site. SAFETY FIRST at all times should be the primary goal.
Read the Installation Manual supplied with your metal building thoroughly before starting construction or installing metal siding. Follow all the instructions and safety precautions exactly.
Workers must wear OSHA approved safety goggles, hard hats, work gloves, and rubber-soled work boots at all times, including during the installation of steel panels.
The Proper Tool for Metal Building Steel Panel Assembly
Do not make the mistake of using cheap tools to assemble your pre-engineered steel building. Low cost, light duty tools often break down, causing unnecessary delays. Industrial rated, high quality tools produce better results— and will cost less in the long run.
RHINO recommends screw guns with an RPM of 1700-2000 for self-drilling screws. For self-tapping screws, use a screw gun with an RPM of 500-600.
 Choose high quality sockets for properly seated screws. Worn sockets cause the screw to waver and wobble during installation. A tight-fitting socket drives the screw straight in for a stronger connection.
The Right Way to Screw Steel Panels to the Metal Building Framing
We recommend pre-drilling the sheeting panels to create a perfectly aligned, professional-looking screw placement. (See the RHINO Installation Manual for detailed instructions.)
Installing the paneling screws correctly is critical.
Drive the screws in straight, not at an angle.
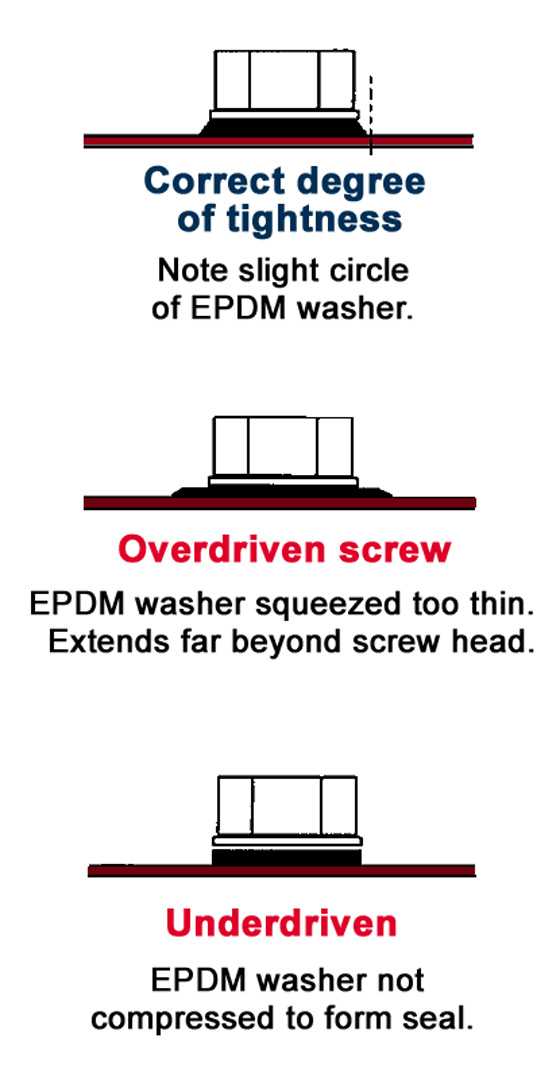
Correctly seat the EPDM washers included with the cast zinc aluminum paneling screws for optimal waterproofing. Overdriving or underdriving the screws may cause leaks. Check to see that the washer extends just slightly beyond the screw head. (See the illustration at right.)
Final Metal Siding Installation Tips
- Be especially careful handling steel sheeting on windy days. Panels may catch enough wind to knock a worker off his feet.
- Stay alert at all times to avoid accidents or falls caused by carelessness when installing metal siding.
- Installing metal siding and paneling creates small metal filing as the screws drive into the steel panels. Be sure to remove all metal filings at the end of each day. Walking on the filings may scratch the panel surface. Left on the panel, filings may rust and discolor the panel surface.
- Never stretch the tape sealant used between PBR panels. Be sure the surface of the panel is clean and dry before placing the tape sealant. Leave the paper tape on the sealant until just before installing the connecting panel.
- Be careful not to place the tape sealant beyond the connecting screw, which may allow wind-driven rain to seep in around the connection.
Any Questions?
Call now and speak to one of our experienced building specialists about how to install steel siding. They will be happy to answer all your questions, discuss your building project, and give you a quick quote. Our number is 940.383.9566.
